Hello everybody, hope you are having an amazing day today. Today, I will show you a way to make a distinctive dish, how to handle a pork chop. One of my favorites food recipes. For mine, I will make it a little bit unique. This will be really delicious.
How to Handle a Pork Chop is one of the most popular of recent trending meals in the world. It’s appreciated by millions every day. It is simple, it is fast, it tastes yummy. They are nice and they look wonderful. How to Handle a Pork Chop is something which I have loved my entire life.
Pork chops are a tender, quick-cooking cut of meat — so quick-cooking, in fact, that they're very easy to overcook. This is why I like to start the chops on the stovetop, where they get a good sear, and then transfer them to the oven to finish cooking. The gentle heat of the oven helps us control the rate of.
To get started with this recipe, we have to first prepare a few ingredients. You can cook how to handle a pork chop using 5 ingredients and 14 steps. Here is how you can achieve it.
The ingredients needed to make How to Handle a Pork Chop:
- Get 2 nice pork chops
- Take Salt
- Prepare Pepper
- Get Oil
- Take Cast iron pan
Generously season your pork chops because pork chop crust is important for flavor. Being liberal with seasoning this will make for a delicious and flavorful pork chop crust. Learn how to cook a pork chop to perfection! Not all pork chops are the same!
Instructions to make How to Handle a Pork Chop:
- First off, get some good pork chops. Thick, beautiful pork chops. I like them off the bone, but either way they should be thick. Part of the fun here is seeking out the best meat that's available to you. I went to a great local butcher for mine. A bit expensive, but worth it in many ways.
- Season up those chops. A nice coat of salt and pepper. Don't skip the sides, especially that strip of fat. Crispy, salty fat, so delicious.
- Now, let your meat sit at room temperature for 15 minutes or so. This is often referred to as 'resting'.
- The trick here is to get as even a temperature as possible throughout your chops. You can only apply heat to the outside, so you can't cook the center without cooking through the surrounding meat. By letting your meat come up gently to a slightly higher overall temperature, you're making it so that you won't have to apply as much energy to reach your target temperature. In practice, this means it's less likely you will overshoot that target.
- Now get a heavy cast iron pan on medium heat. Leave it awhile to heat up, a few minutes at least.
- Pour in some oil. Grapeseed oil, vegetable oil, olive oil, whatever you have. Hang a chop into the hot oil. If it sizzles nice and steady, it's hot enough. Place both pork chops in the pan. Tap 'em down a bit to make sure they connect. A little word of warning here, this activity tends to splash hot oil, so watch yourself.
- Now you have 2 options. You can set a timer for 4 minutes, or you can go with your gut. Either way, if you flip them just right, they'll have a beautiful, golden brown, crusty finish. Otherwise, better luck next time.
- The other side gets the same treatment.
- Don't forget the remaining sides. This is a common mistake. You miss out on a lot of flavor if you don't crisp up that fat and get caramelization anywhere you can find it. Sometimes you'll get a misshapen chop, and it'll be difficult to balance it on a side. try leaning it against the edge of the pan, or balance multiple chops against each other. Do what you can.
- When they're crusty golden all around, transfer your chops to a cutting board and don't touch them for about 10 minutes. Resting again. This lets the cooking sorta coast to a stop.
- Maybe put a little butter or olive oil on those bad boys (maybe even an herb butter or an infused oil for added flavor). That extra flavor will soak in as your chops cool.
- Meanwhile, you should have a hot pan sitting there with some little chunks of meat stuck to the bottom. That's flavor. Don't waste it. While the pan is still hot, pour in a little alcohol, anything you're willing to spare, and scrape those chunks up into the resulting liquid. Now season that liquid a bit and either serve it over your chops, or set it aside for another use.
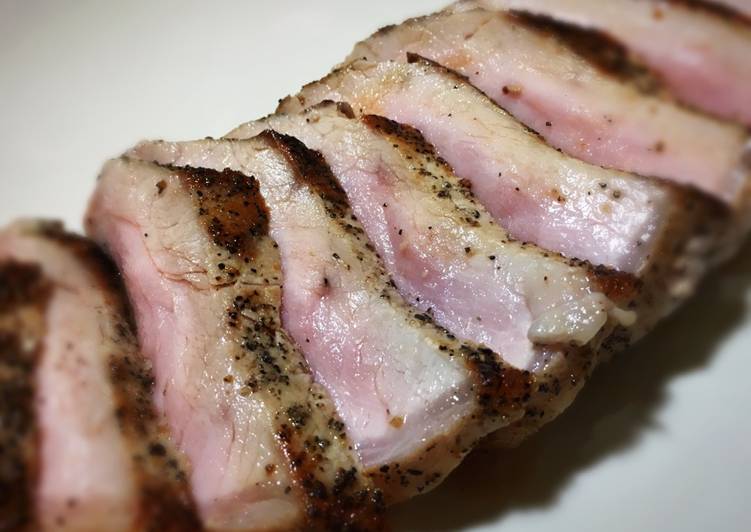
- Ahhh, finally, the moment has come. Look closely at your fine hunk of seared meat. You will see, as in a piece of wood, that the meat has a grain, and that the grain is aligned in a specific direction. With a sharp knife, slice perpendicular to the alignment of this grain. The grain denotes the direction of muscle alignment. Slicing through those muscles instead of with them, will make for tender slices.
- Now fan out those nice slices on a plate. Serve it with anything. A big chunk of meat like this should really be the star of the show. Maybe dress it up with a little olive oil or arugula, or coat it with a sauce or relish of some type. Pork loves apples, rosemary, potatoes, or maybe some big, brutal flavors like whisky or molasses.
BBQ pork chops are simply foolproof for summer. These classic, saucy grilled chops will have everyone licking their chops for more. Learn how to make the perfect, juicy, and flavorful pork chop with these helpful tricks on preparation, cooking temperature, and more. Pork chops are a common dinnertime entree as they are somewhat simple to make and can be paired with a variety of flavors and ingredients. Is it safe to eat leftover food that was left out on the counter to cool at dinnertime, then forgotten until morning?
So that is going to wrap this up for this exceptional food how to handle a pork chop recipe. Thanks so much for your time. I am sure that you can make this at home. There’s gonna be interesting food at home recipes coming up. Don’t forget to save this page in your browser, and share it to your family, colleague and friends. Thank you for reading. Go on get cooking!